
I survived my first semester of nursing school(sanity just barely intact)!! I was actually done like 2 weeks ago, but today is the first day that I haven't had a to-do list of stuff that I've been neglecting for the past 4 months. Top of the list: uploading all of the pics I've taken...408 to be exact. Next, start playing in Lr3!! Yay! Actually, I guess really next is to go find a book about how to best use the thing, then start playing. Time to get back to work!
I survived my first semester of nursing school(sanity just barely intact)!! I was actually done like 2 weeks ago, but today is the first day that I haven't had a to-do list of stuff that I've been neglecting for the past 4 months. Top of the list: uploading all of the pics I've taken...408 to be exact. Next, start playing in Lr3!! Yay! Actually, I guess really next is to go find a book about how to best use the thing, then start playing. Time to get back to work!


It's Sally Hansen Salon Manicure Topcoat. This stuff is AWESOME!!! I rarely keep nail polish on because it's such a waste of time for me, it's usually chipped by the end of the day. If I wanted to wear some I had to put it on after I took a shower and not get my hands too wet(no dishes or cleaning). I have tried numerous topcoats, basecoats, different brands of polish, and nothing has ever stayed on more than 24 hours(except Shellac, but that's a little expensive for me on a regular basis).
I picked this stuff up while wandering through Wal-Mart, and it was $6.97. Unfortunately I threw away the box after I knew it was a keeper, so I can't tell you what the special ingredients are supposed to be. It does claim to keep a chip-free manicure for up to 10 days, and I am on day 3 with only 1 chip because my nail broke :(
So far, I love love this stuff!!
This post was not sponsored or paid in any way, I bought the polish and am giving my honest personal opinion on it.
I am going to take these episodes as empathy training for my future career-as opposed to an indication that I may need to take a trip to the drug store-and try to remember this as I move forward: everyone handles stress and sickness and loss differently. I will not presume to know the level of reaction that is appropriate in many of those situations, and at the same time try not to be reduced to a puddle of tears when I witness something awful.
On another note...a while back, while I was a stay at home mom, I attempted(well really half-attempted) to start a photography business. Let me just say, I'm pretty sure that I will be abandoning that effort for a while. I started portfolio building, and during that time doing shoots for people for REALLY cheap-meaning you pay for the prints you want at cost. I found that people were generally very demanding, and not very grateful. One client asked me why if this was for my portfolio I wasn't doing unlimited free prints too. At that point I realized that while I love photography, doing it for money is not for me. I don't want to have to take jobs to pay bills. So I decided that Candy Apple Smiles will still live, but on a much smaller scale than I originally envisioned. I am planning on just doing jobs for people that I know, and really only when I have time. And most likely "at cost". Making this decision has de-stressed me a little, and deciding that I am going to do exactly what I want makes me happier than the prospect of more miserable encounters. In addition, I promise myself I will buy accessories for my hobby without guilt, or the feeling that I need to make some money from this to justify buying more/better stuff. With that said, I am buying myself a gift to kick off my "pictures for pleasure" phase:
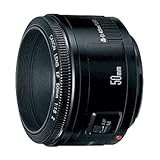
This little gem, a Canon 50mm f/1.8. I am so excited!!
Have you ever had to make a decision that was disappointing and liberating at the same time?
I went on lionbrand.com after buying some of their yarn and discovered a wealth of free patterns!! I was originally looking for a hat pattern (which I found, but more on that later) and came across this gem that got added to Craftyness for a rainy day. Well it didn't exactly rain, and I don't really have much free time, but Michaels had a great sale on one of my favorite yarns for making cozy stuff so I was able to get a bunch. BTW-no one told me that once you start making things that actually look good this becomes a sick addiction...I have a huge basket that has been filled with "just in case I have time to start something" yarn.
Anyway, here's a look at what I've got so far.

I like blankets a lot. What I don't like are the funny sized ones that don't quite cover you when you're on the couch trying to watch a movie and be comfy. The pattern says the finished size is 36x41 in, which is too small for something for an adult to me. So I figured out how to increase it by basically counting the stitches needed for one ripple and then adding ripples until I thought it would be wide enough. I ended up adding 4 ripples to the width, and it's measuring about 54 inches across. If you notice the discrepancy in the amount of ripples I added being proportionate to how much bigger the thing should be, just turn a blind eye. I did a big no-no...I didn't make a guage swatch (gasp!!). SO instead of each of the ripples being 6 inches as the pattern says, mine ended up being more like a little less than 5inches. I also started with a size N hook because I know I crochet tighter than apparently normal, and that is what I got. Since it's a blanket and not a sweater, and since I'm still relatively new to the whole thing, I'm not worried about it. I will probably use more yarn (this is almost 1/3rd of the length I want and I'm on the 2nd ball of each color) but that's ok for me too.
I am so excited about finishing it someday soon, it has a good weight and a soft feel to it.
I have had some folks say that they dry clean finished products to make them fluffy and keep from fuzzing up...any thoughts on that?

BTW-this is not a sponsored post!
On another note, I am keeping(mostly) up with my resolution to take a photo everyday-made much easier by figuring out how to get pics off of my phone! Once I get some sort of organization to the mass of photos I am uploading I'll dump them in here.
Also, I've been crafting as much as possible, knocking some things off of my Craftyness to do list! Currently I'm working on this but in chocolate, cream, and dark red. I'm pretty proud of myself for figuring out how to adjust the pattern for a more comfy wrap-around size. :) Once it's done I'll put up how I did that too.
So lots of things on my plate, but I'm definitely still making it!
This one is from the fall, I love her face :)

So the 365 includes:
1.) taking a picture everyday for the whole year and keeping them organized well
2.) Blogging about it!
3.) Making sure that I am actually in at least one pic a month
4.) At least one pic a month of a craft I am working on/have finished
This past week has been heaven, Hubs was on vacation so I got to sleep in and have breakfast in bed. With all the time I had to rest and recharge between shifts I had time to just thank God for such an awesome husband. It was his vacation too, and he did everything I asked(and didn't ask) without complaining.
The kids had an awesome Christmas, and we hosted dinner at our house so I didn't have to cart the kids and watch the clock on Christmas day. Tomorrow morning we go back to reality: up around 7am and work in the afternoon. However, I am going to buy lightroom 3 and the humongo class in a book and start playing. I know I've been talking about getting it for a while and haven't, but I just found out I get a SWEET discount through the University so I really have no choice now.
This year I have decided, while not an official resolution, to let some things go. I feel like I always have too much to do: things to buy, crafts to do, cleaning, and now added schoolwork....I am going to make an effort to stress as little as possible. This year my house will not be constantly spotless, my kids will watch more TV than I like(still not spongebob though), my craft board on pinterest will continue to grow with things I hope to one day do, and I will have to make a list of books I want to read and save it for spring break. This year begins my journey into my career, time for me to truly grow up and become who I know I am called to be...and in that growing up realize that some things will have to be put to the side for a while so that our family can reach it's full potential. MaddieBoo already tells anyone who will listen that her mommy is in nursing school, and the pride in her voice when she says it is so much motivation for me to get this thing going already! This year begins my journey into becoming a person that my children will be proud of, and that I will be proud of too.
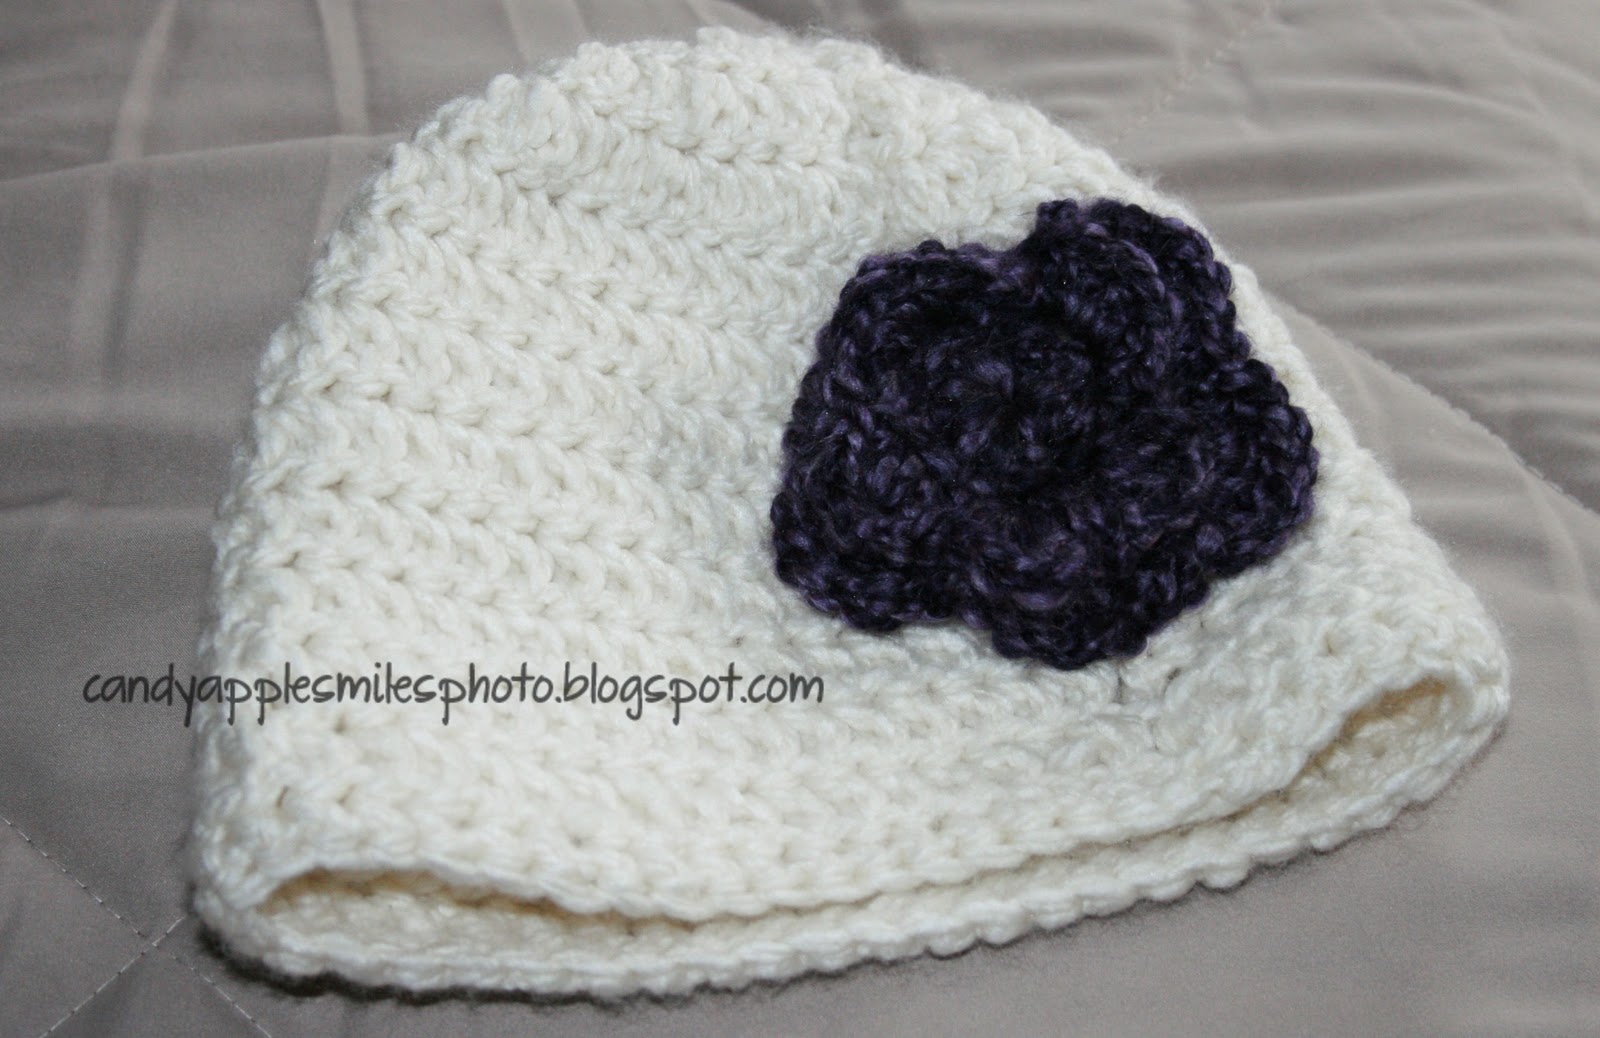
I found the pattern for the hat on Pinterest, but here is the direct link to her blog.

This one came from here, I just made the flower part of the headband
Here's my next project:

I'd like to put bigger flowers on my future hats, and this one should be about the size of my whole palm where the purple one is a little smaller. Since I have started learning to crochet and I'm getting better at it I may take some time to come up with my own patterns for hats and flowers. If I do, I'll be sure to post them here :)
Happy Thursday, and here's to a crafty weekend!!
- My awesome kiddos are healthy and happy, and adjusting well to Mama going to work
- I am starting nursing school in January, it's been a long time coming!
- making time to craft is not as difficult as I thought, and it justifies the time I spend on Pinterest
- the money coming in is more than the money going out
- my $2 avon matte nail polish has stayed on longer than any other brand I've used to date
- at 10am dinner is cruising right along in the crock so I know there will be no fast food in my house tonight
- the doc says I've lost 8lbs since starting my new job-even though I have been eating whatever I want lately
- And this:

Maddie's 5th birthday outfit


The kids play in here when I am working so I can keep an eye out, but looks like these guys forgot to go home

Reminded me of a scary movie while I was looking up at it this morning, I guess not so much now :/
Not my original plan, but interestingly enough an accurate depiction of how I was feeling this morning.
I seriously think I have a problem, I can't really relax in my house unless it's clean. There is probably some real disorder named clutterastressaphobia or something...this morning was the first time in years, maybe ever actually, that I just went to bed without attempting to straighten up or do dishes. I blame the intense fatigue that has been hanging on my back for the previous 5 nights...but it's almost over. Then I can get my house back in order....really though, who get excited about uninterrupted cleaning time?
Even though I've been slacking on my blog I've still been reading my favorites on my phone everyday, and boy does Mandey have some gorgeous boys! I wish that my hair was even half as curly as those cutie pies...
I've also still been taking lots of pictures, experimenting with the camera and trying to get some pictures of the kiddos together and smiling-this is proving to be a bigger challenge than I originally anticipated. They usually end up looking a lot like this one from last night:

I love my little punkin, but he looks a tad scary in this picture. He smiles and giggles at the camera, and somewhere between when I press the shutter and the picture comes up on the screen he manages to make this face. Almost every time.
So until "we" can do better I'll have these cuties side by side on my desk:

BTW, my obsession with pinterest has not cooled even though I have less time for it lately, I've been finding and trying some great recipes and crafts from there so I'll be doing some short posts on those to pass along. If I can do it with the craziness at our house right now I'm sure anyone can!


The puffer is one of my new favorite accessories! I got mine on ebay for pretty darn cheap(about $5), and while I don't know how it compares to a more expensive one, I like the results I've gotten so far.
Here's my example:

The first one was taken without the puffer, the second with. Both are SOOC, just sharpened for web-the second is actually sharpened a tad more than I like but I am far too lazy right now to go back really trying to get this post done.
I think that the differences are pretty obvious, but I also know that images can look different depending on the web browser you use.
So: The one without the puffer looks more washed out, her skin tone looks very uneven and she has dark shadows under her eyes. The one with looks much warmer, and the dark areas under her eyes are not prominent.
I tried doing this example using one of my son's trucks first because I didn't want to go through the drama of getting MaddieBoo to pose without the drama (strange looks and limb positions that she thinks are cute), but I didn't get the difference I was looking for. So far my experience using the puffer on non-human subjects has led me to believe it's not useful, but of course there is much more experimenting to be had.
For about $5 I save myself some post-process time....works for me. Any thoughts?
With that said, I am going to finish up the rest of the posts that I planned and get those out to you guys, and I'll have to play it by ear to see if I can actually squeeze out my original goal of 31 days!
I am soooo not a morning person, so the kiddos and I are off to get ready for tomorrow and bed.
Do any of you work full time with 2(or more) kiddos and still find time to do it all? I could use some advice and encouragement cuz I'm STRUGGLING over here!
I'll leave you with this bit of awesomeness from Pinterest, I made this with roast on Sunday and it was a keeper!

I originally planned to include this in my post the other day about exposures, but the fact is I am trying to stick with 31 days, and I still have about 7 days worth of ideas to come up with to meet that goal. Besides, makes me take more pictures everyday when I am experimenting to get shots to use in these posts :)
This is an excellent function to use while you are still learning what makes a good exposure/what exposure appeal to you. When set, the camera takes three shots at "regular" exposure and two others that you select, for example one stop over and one stop under. This way you are closer to ensuring a usable shot, and you may even stumble upon an exposure that takes your shot from good to wow!
Here's how you set it on an XTi:
-Press the menu button (to the left of the screen) and arrow right to the camera picture with 2
-Select AEB
-Arrow left or right until you get the range you want
-Press the shutter button half way and that locks in your setting
Here's an extra tidbit: if you are already shooting under or over before you go to change the setting it will let you choose with that being your midpoint. So if I am already shooting at +2, when I go to set it my bar will have 2 in the middle and will spread out from there with the end points being "correct" exposure to the left and +4 on the right.
If you try this out or have questions (I'll try to help), leave me a comment!
So lets talk drive modes. What's this you ask? Basically it means how many shots your camera will take in a row. Discovering this little nugget a couple of months ago has been awesome for me, so helpful as I try to capture special images of a 1 and 4 year old. The XTi has 3 drive modes, which can only be selected when you are shooting in the creative modes (even more reason to explore those guys). They are single shot, continuous, and self-timer/remote.
They are pretty self-explanatory, but lets just go there. Single means you get one picture each time you press the shutter, and you can get up to 3 shots per second. Continuous means you can do the 3 images in a row per second, or a burst of shots (different amounts depending on the image quality that you are shooting in). According to Canon you can burst about 27 large JPEGS, 10 RAW, or 8 RAW + L.
Here's how you do it:
Select continuous by pressing the 2nd button down on the right of the screen and arrowing to the center icon. Then you compose your shot and hold down the shutter. The camera will continue to take pictures until the buffer memory is full, and then it will give you a busy message until it has put those images onto your memory card and has room to shoot again.
And lastly, the self-timer/remote will give you either 10 seconds until it takes a shot once you press the shutter, or just take the shot if you are using a remote.
Both of my sources seem to suggest changing your Auto Focus mode if you will be shooting continuously, especially if your object will be moving. I'll get to that in an upcoming post, but for now try it out!
I was thinking of maybe trying to learn to make one of those cool little movies where you put a bunch of stills together, but I think that will have to wait until I have more time to spend in the digital darkroom. However, if you have made one and posted about it, or know of a source that has good instructions please leave me a link in the comments! Also, if you have any cool ideas for others who want to try this out and just don't know what to shoot leave that too!
You can see the meter on your screen and in the viewfinder, if you have not played with it (and are not in manual) the little bar should be right in the middle. If you want to change it, hold down the Av button (top right on the side of the screen) while turning the dial either way. If you turn left you will make your next shot darker, if you turn right it will be lighter. Here are my examples:

(All of these are SOOC, just sharpened and saved for the web)
The center picture is the "regular" exposure, taken at 1/40, f 4.5
Top left is one stop underexposed (-1), top right is two stops underexposed (-2), bottom left is one stop overexposed (+1), bottom right is two stops overexposed (+2)
If you notice when you are taking your pictures, the camera will show you how each stop changes your aperture and/or shutter speed, depending on what mode you are in. I took these in Av, so my shutter speed got faster as the picture darkened, and slower as it lightened.
Like my cool little storyboard? That came from Rita at The CoffeeShop Blog, and was free as is most of her stuff. It was easy to install (once you get the hang of installing actions) and pretty easy to use, it took me about 35 minutes to get it web ready.
Go give changing your exposures a try, you may find a totally different way of shooting that you love!
Okay, this may be totally obvious to some, but I literally just found out on accident yesterday that you can zoom in on an image after you take it. I have been able to do this with every other digital camera I've had, but I guess I thought you couldn't with this one because you can't use the screen to compose...don't ask me why I thought these two things were connected.
Here's how:
Hit the "play" button (3rd down on the left of the screen) and select the picture you want to see. Then just push the zoom buttons on the upper far right. Not really sure what I thought those buttons were for anyway, but this has changed my life already lol! Since I have been experimenting more with my camera I am finding that images I thought were great are really not so great once I get to PSE...many not in the focus I want. I think I need to upgrade to a camera with a bigger screen...but how to convince Hubs....
Anyway, this zoom tool is not really practical to check every shot, but if it is important I know I can check before I get to post-processing.
Later today I am going to be an editing fool, so I should have something to show photo-wise for the last couple of weeks coming soon. Speaking of, anyone have any suggestions on learning Lr? I am brand new to it, and after opening it yesterday and blankly staring for a few minutes I gave up (could have been the 2 glasses of moscato while cooking/eating dinner, but so be it I love that stuff). I am off to the bookstore to try and read up but would love some help in the meantime, just leave me a comment!
EF-S lenses line up with the white square on the front of the camera, and EF lenses line up to the red dot, so if you are actually looking at a camera body and trying to decide if one or both types of lens will work, look for those. If there is only the red dot the EF-S lens will not work.
I looked up why this is, and the answer is a lot of technical stuff that breaks down to the EF-S will damage a professional camera because there is a shorter distance between the lens and the sensor.
If you plan to upgrade to a 7D both types are compatible, so you don't need to be as concerned about that aspect of your purchase.
I hope this info is useful to someone, because I know I had no idea that all canon compatible lenses don't actually go on all Canon cameras!
If you have any tips or extra info please leave it in the comments!
You will need a tripod, or something secure to rest your camera on, and a remote would also be helpful to reduce camera shake.
You will also need a secure spot to work in, just in case a torrential downpour starts!
If you have a wide angle lens or lens attachment, get it out. The more sky you can see in your lens the better chance you have of actually getting lightning in your picture.
Set the camera to ISO 100 (press the ISO button and arrow to the left)- you want the sharpness and color saturation of the low ISO.
Change your image size/quality to RAW. I always shoot in RAW + L, which while it takes up more memory gives me a RAW image that I can more easily manipulate, and a large JPEG.
I also enabled my mirror lockup: push the menu button, arrow right to the button with the tools and 2, arrow down to custom functions and select. Then arrow right to 07 (mirror lockup), select, and arrow up or down to choose enable. After that I just press the shutter half way to go back to my "ready to shoot" screen. If you've done it right you will see C.Fn just above RAW on your screen.
I used an aperture of 8 because I read somewhere that you should use a smaller aperture.
So you are outside and all set up, pointed in the direction of some lightning, now you just press your shutter-or the remote button- and wait for some lightning. When you get some, press it again.
If you have tried this and have pointers please share in the comments! Also, if you can think of any other times this technique might be useful, so I don't have to wait potentially a very long time to see some lightning and try again...
The low down:
The ISO is the sensor's sensitivity to light; so the higher the ISO, the more sensitive it is and the lower light you can shoot in, and you can also use a faster shutter speed. When you use the higher ISO's (800/1600) you get less effect of camera shake. Seems all good, but with high ISO's you also get grain. Sometimes grain is good depending on what you want, but of course not always.
Some tips I have read that I think are helpful are if your subject is far away, increase your ISO. Also, if you have plenty of light, use the lowest ISO.
*High ISO also increases your file size, so beware especially if you are shooting in RAW +L where you already have larger files*
Low ISO gets you better sharpness, color saturation and contrast, but you generally need to use a slower shutter speed, increasing the chances that you will need a tripod or some other method to steady the camera.
Here's how to change the setting on an XTi:
Push the ISO button, and arrow to the one you want.
I suggest trying to do a variety of shots on a high ISO and a low one, and then go to your editing software so you can zoom in and see the differences.
Get out and try it, and as always if you try it or have any helpful info to add leave a comment!
Hello folks! I thought I'd touch on something super easy to do on your camera, which is changing your image size/quality. I prefer to shoot in RAW + L now that I am out of using full auto mode, mainly because it gives me so much more freedom in the digital darkroom. I have been able to save some images that I may not have been able to if they were JPEGs. Of course, getting the shot right straight out of camera is the best thing, but for those of us who stumble upon a moment you have to get and your settings are just a little off RAW can be an image saver. It won't magically transform everything, but it's an option. From what I understand RAW stores the image as the pixels, and you have to use a special program (like Adobe Camera Raw) to process the image. When I upload my images into Photoshop Elements it shows me 2 images in the organizer, and often they look slightly different, the RAW one is usually lighter. If your camera came with a disk it will most likely have ACR on the disk.
So here's how you change your image quality to RAW:
Press the menu button to the left of the screen.
Under the first section (it has a picture of a camera and 1) the first choice is quality
When you select it there's a whole table of choices, so choose RAW +L or just RAW.
*Just as a side, your files will be considerably larger when shooting in either RAW choice-I make sure to delete any photos I don't want, or make sure they are moved to my portable hard drive to prevent bogging down my computer*
Like I said I prefer the first, but if you are just trying it out and taking shots you may want to keep I suggest it. That way if you decide you don't want to be bothered with this RAW business you will still have the pictures in JPEG.
If you don't already shoot in RAW, go try it out and leave me a message with how it went! If you do shoot in RAW and have anything to add please share!
Subscribe to:
Posts (Atom)


